 Save
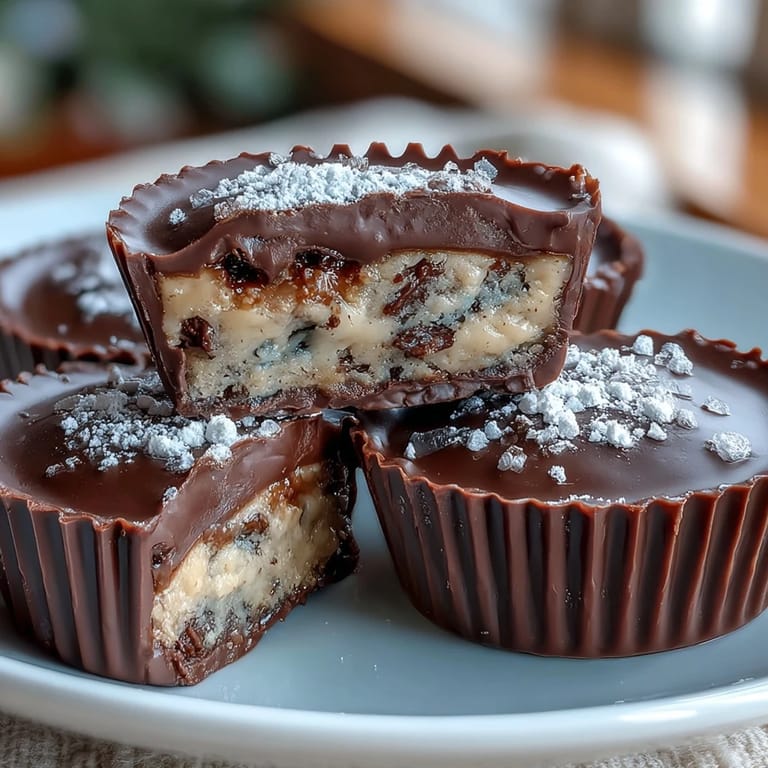
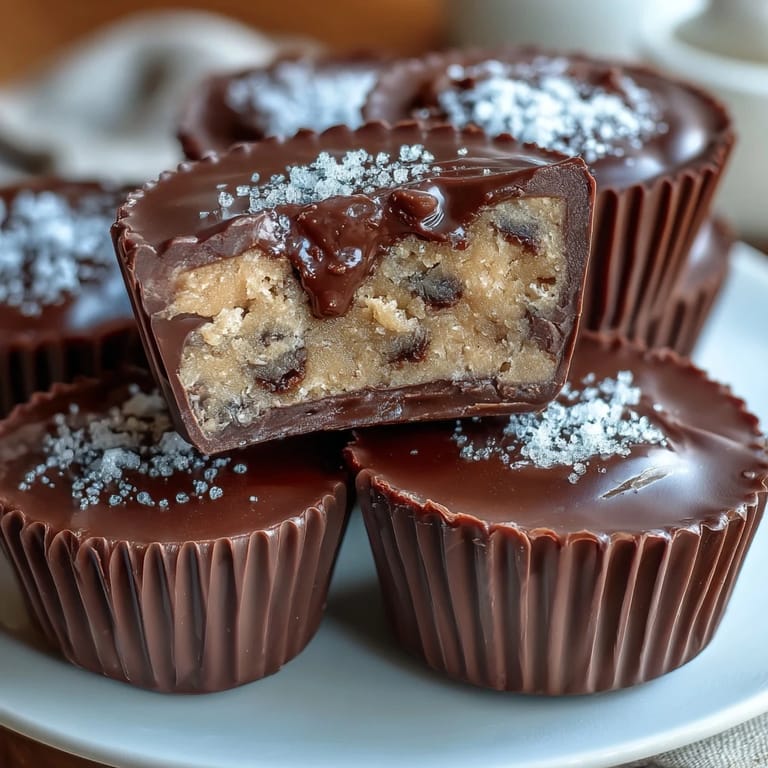
Save My roommate challenged me to combine cookie dough and peanut butter cups in one bite, convinced it was impossible. Three test batches later, I proved her wrong—and honestly, these are dangerous because they disappear too fast. The moment chocolate meets that creamy peanut butter layer with actual edible cookie dough peeking through, you understand why this mashup works so perfectly.
I made a batch for my coworker's birthday potluck, and watching her face when she bit into one and discovered the cookie dough center was worth every minute of layering and chilling. She sat there in stunned silence for a beat, then asked if I'd quit my job to become a chocolatier. That's when I knew these weren't just good—they were memorable.
Ingredients
- Unsalted butter (softened and melted): The foundation of both the dough and the peanut butter layer; softened butter creams better, while melted adds richness to the filling.
- Light brown sugar and granulated sugar: Brown sugar brings moisture and deeper flavor to the cookie dough, while granulated sugar provides structure and sweetness.
- Vanilla extract: A small amount amplifies the cookie dough character without overpowering the other layers.
- Heat-treated all-purpose flour: This is non-negotiable for safety when eating raw dough; microwave for 1 minute or bake at 350°F for 5 minutes beforehand.
- Mini chocolate chips: Their small size distributes evenly throughout the dough and creates little bursts of chocolate with every bite.
- Creamy peanut butter: Use a good quality version; the peanut butter is essentially its own layer of flavor, so it deserves attention.
- Powdered sugar: This sweetens the peanut butter layer and gives it a silkier texture than granulated sugar would.
- Semisweet or milk chocolate chips: Choose based on how rich you want the coating; semisweet leans darker, milk chocolate is sweeter.
- Coconut oil or vegetable oil: Just a teaspoon or two keeps the melted chocolate smooth and prevents it from seizing up.
Tired of Takeout? 🥡
Get 10 meals you can make faster than delivery arrives. Seriously.
One email. No spam. Unsubscribe anytime.
Instructions
- Heat-treat your flour first:
- Before you start anything else, pop the flour in a microwave-safe bowl and heat on high for 1 minute, stirring halfway through, or bake it at 350°F for 5 minutes. This kills any bacteria and makes the raw dough safe to eat. Let it cool completely before using.
- Cream the butter and sugars together:
- In a medium bowl, beat the softened butter with both sugars until the mixture is light and fluffy, about 1 to 2 minutes. You'll know it's ready when it looks almost mousse-like and smells incredible.
- Build the cookie dough base:
- Stir in the vanilla and milk until combined, then fold in the cooled heat-treated flour and salt gently. The dough should come together without overworking it. Fold in the mini chocolate chips, then set this bowl in the fridge while you start on the chocolate base.
- Line and prep your muffin tin:
- Line a 12-cup muffin tin with paper liners and set it on a flat workspace where it won't tip over.
- Melt the chocolate carefully:
- In a microwave-safe bowl, combine the chocolate chips with the coconut oil. Microwave in 30-second bursts, stirring between each one, until completely smooth and glossy. This gentle approach prevents the chocolate from seizing and becoming grainy.
- Create the chocolate base layer:
- Spoon about 1 tablespoon of melted chocolate into each liner, then tilt and tap the muffin tin so the chocolate coats the bottom evenly. Pop the tin into the freezer for 10 minutes until this layer sets firm.
- Make the peanut butter layer:
- While the chocolate chills, mix together the creamy peanut butter, melted butter, powdered sugar, and a pinch of salt in a bowl until you have a silky, spreadable mixture with no lumps.
- Add the peanut butter:
- Remove the muffin tin from the freezer and drop a heaping teaspoon of the peanut butter mixture onto each chocolate base, using the back of a spoon to flatten it slightly into an even layer.
- Press in the cookie dough:
- Retrieve that chilled cookie dough and scoop about 1 teaspoon onto each peanut butter layer, pressing it down gently so it stays in place. The dough should nestle into the peanut butter without sliding around.
- Seal with the chocolate top:
- Spoon or drizzle the remaining melted chocolate over each cup, making sure the chocolate completely covers all the fillings and seals the edges. Smooth the tops with the back of a spoon for a polished look.
- Final chill:
- Place the entire tin in the fridge or freezer for at least 20 minutes until the chocolate is set and hard to the touch. If you're in a hurry, the freezer does this in about 15 minutes.
 Save
Save The first time someone I barely knew took one of these to a work gathering and came back to tell me it was the best thing they'd eaten all month, I realized these little cups had become my signature dessert. There's something special about food that makes people pause and actually taste it instead of just eating it.
Storage and Make-Ahead Tips
These keep beautifully in an airtight container in the refrigerator for up to a week, though they rarely last that long. You can actually assemble these a day ahead up to the final chocolate seal, then finish them the next day—just let the cookie dough and peanut butter layers chill overnight before topping with chocolate. For longer storage, freeze them in an airtight container for up to a month; they're almost better eaten straight from the freezer anyway, when the chocolate snaps satisfyingly when you bite down.
Flavor Variations Worth Trying
Once you master the basic version, the doors open wide for experimentation. Dark chocolate lovers should swap the semisweet for dark chocolate chips in both layers, or use dark chocolate for the coating and milk chocolate for the base. A tiny pinch of flaky sea salt sprinkled on the chocolate before it sets adds an elegant contrast, while a drizzle of salted caramel between the peanut butter and cookie dough layers transforms these into something almost restaurant-worthy.
Troubleshooting Common Issues
If your layers are sliding into each other, your freezer time between steps isn't long enough—lean into patience here. If the chocolate coating is too thick and cracking when you bite down, you likely added too little oil to the melted chocolate; aim for a consistency like warm honey. If the peanut butter layer feels greasy, you've used too much melted butter; next time use just 1 and a half tablespoons instead of the full 2 tablespoons.
- The cookie dough should have the texture of soft, room-temperature dough, never stiff or crumbly.
- Always let chocolate cool for a minute after melting before handling the cups, or you'll accidentally soften the layer beneath.
- These are best eaten at cool room temperature rather than straight from the fridge, which makes the chocolate too brittle to bite through cleanly.
 Save
Save These peanut butter cups prove that sometimes the best desserts aren't the most complicated ones—they're the ones that make you close your eyes for a second when you taste them. Make a batch for yourself, then make another batch for someone who needs a small moment of joy this week.
Recipe FAQs
- → How is the cookie dough made safe without eggs?
The flour used in the cookie dough is heat-treated by microwaving or baking to eliminate bacteria, ensuring it is safe to consume without eggs.
- → Can I substitute dairy ingredients for a vegan version?
Yes, using almond or oat milk instead of regular milk, and choosing dairy-free peanut butter and chocolate chips can create a vegan-friendly version.
- → What is the chilling time required for the cups?
The peanut butter cups need about 30 minutes chilling after filling and a final 20 minutes to set completely, ensuring firm and neat shapes.
- → What role does the coconut oil play in the chocolate coating?
Coconut oil helps melt and smooth the chocolate chips, making the coating glossy and easier to spread evenly over the fillings.
- → Can I use dark chocolate instead of semisweet for coating?
Absolutely, dark chocolate can be used for a richer, more intense flavor, providing a nice contrast to the sweet peanut butter and cookie dough layers.
- → How long do these cups stay fresh when refrigerated?
Stored in an airtight container in the refrigerator, the cups remain fresh and delicious for up to one week.