 Save
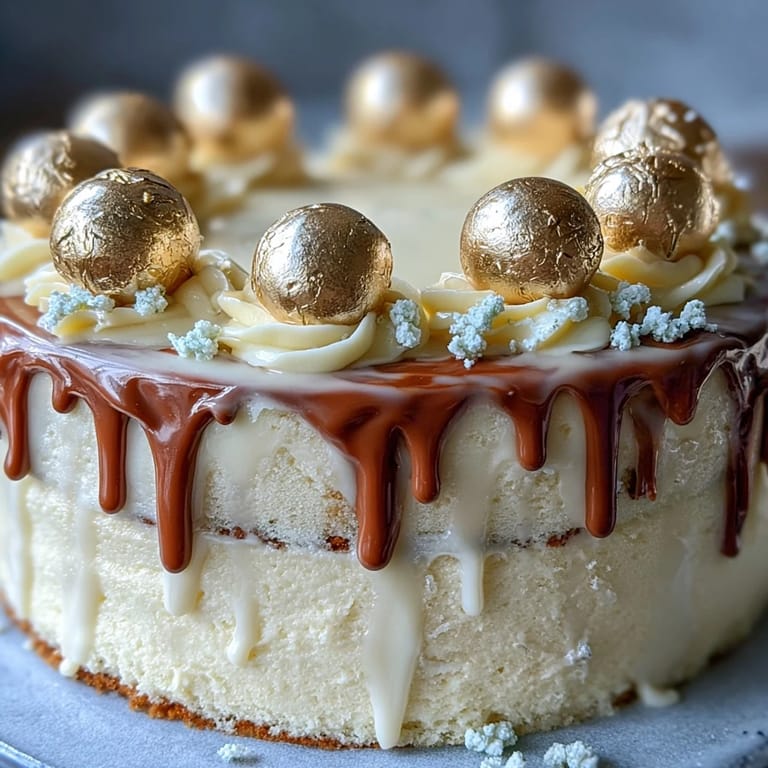
Save My friend Sarah texted me three weeks before her graduation: "I want a cake that screams celebration." I thought about all the cakes I'd made before, the safe choices, the forgettable ones, and decided this time would be different. White chocolate drip, gold accents, layers of vanilla sponge—something that felt like stepping into adulthood in the best way possible. When I pulled the first cake layer from the oven and that warm vanilla scent filled my kitchen, I knew this was the one.
I remember decorating this cake in my small apartment kitchen at midnight, gold spray everywhere, my hands sticky from buttercream, and somehow feeling more calm than nervous. There's something about creating something beautiful for someone you care about—it quiets the doubt. By the time I added those final gold balloons, I wasn't thinking about technique anymore; I was thinking about Sarah opening her eyes on graduation morning.
Ingredients
- All-purpose flour: The foundation of everything—use the best quality you can find because it makes a noticeable difference in the crumb structure and how long the cake stays fresh.
- Baking powder: Don't skip the sifting step; lumps here mean dense pockets in your cake that no amount of mixing fixes.
- Room temperature butter and eggs: This seems fussy but isn't—cold ingredients won't cream properly and you'll end up with a slightly dense cake instead of that cloud-like texture we're after.
- Pure vanilla extract: Not the imitation version; your guests will taste the difference in every bite.
- Whole milk: The fat content keeps the crumb moist without making it heavy, which is why all-milk (not buttermilk) works best here.
- White chocolate for buttercream: Choose a quality bar chocolate, not the waxy baking chips—they melt smoother and taste richer.
- Heavy cream: Keep extra on hand for the buttercream consistency adjustment; humidity affects how much you'll actually need.
- White chocolate for drip: Finely chop it so it melts evenly and cools to the perfect pourable consistency without seizing.
- Crispy pearls or malt balls: These become your balloon bases and add a subtle crunch when guests bite through the frosting.
- Edible gold spray or luster powder: Either works, though spray is faster and less messy if you're decorating close to serving time.
Tired of Takeout? 🥡
Get 10 meals you can make faster than delivery arrives. Seriously.
One email. No spam. Unsubscribe anytime.
Instructions
- Prepare your pans:
- Preheat your oven to 350°F and grease three 8-inch round pans thoroughly, then line the bottoms with parchment paper cut to fit—this one step prevents the heartbreak of a cake stuck to the pan. Trust the routine here.
- Combine dry ingredients:
- Whisk flour, baking powder, and salt in a medium bowl, making sure everything is evenly distributed. I like to whisk it three times rather than twice, just to be absolutely certain.
- Cream butter and sugar:
- Beat them together in a large bowl until the mixture looks pale, fluffy, and almost creamy—about three minutes with an electric mixer. You're creating air pockets that will make the cake rise and stay tender.
- Incorporate eggs and vanilla:
- Add eggs one at a time, beating well after each addition, then add vanilla extract and mix until smooth. If you add them all at once, the batter can look separated and sad, but one-by-one they fold in like they belong.
- Alternate wet and dry:
- With the mixer on low speed, add flour mixture and milk in three additions—flour, milk, flour, milk, flour—beginning and ending with flour. Mix only until you don't see streaks of flour anymore; overmixing develops gluten and toughens the cake.
- Divide and bake:
- Pour batter evenly among pans (I use a kitchen scale to get exactly equal amounts), smooth the tops, and bake for 30 to 35 minutes until a toothpick comes out clean. The tops should barely spring back when you touch them gently.
- Cool properly:
- Let cakes rest in pans for 10 minutes—this matters because they're still setting—then turn out onto wire racks and cool completely before touching them. Rushing this step leads to layers that crack or slip when you stack them.
- Make the buttercream:
- Beat room temperature butter until smooth, then gradually add sifted powdered sugar while mixing to avoid clouds of sugar flying everywhere. Pour in melted white chocolate (must be cooled), vanilla, salt, and 2 tablespoons of heavy cream, then beat until it looks light and fluffy like clouds.
- Stack and crumb coat:
- Level the cake layers if they dome, place the first one on your serving plate or cake board, spread with buttercream, repeat with the second layer, then add the final layer. Cover the whole cake with a thin layer of frosting to trap crumbs, then refrigerate for 30 minutes so the crumb coat sets.
- Apply final frosting:
- Add a generous, thick coat of buttercream, using an offset spatula to smooth the sides and top until they look almost like marble. Take your time here; this is where the cake goes from homemade to stunning.
- Create the white chocolate drip:
- Heat cream until you see small bubbles at the edges, pour it over finely chopped white chocolate, wait one minute without stirring, then stir until completely smooth and glossy. Cool it to room temperature (not cold, or it won't drip properly) before using.
- Drip artfully:
- Using a spoon or squeeze bottle, let white chocolate cascade down the sides from the top edge, letting gravity do most of the work. Some drips should be dramatic and long, others short and playful—unevenness is part of the charm.
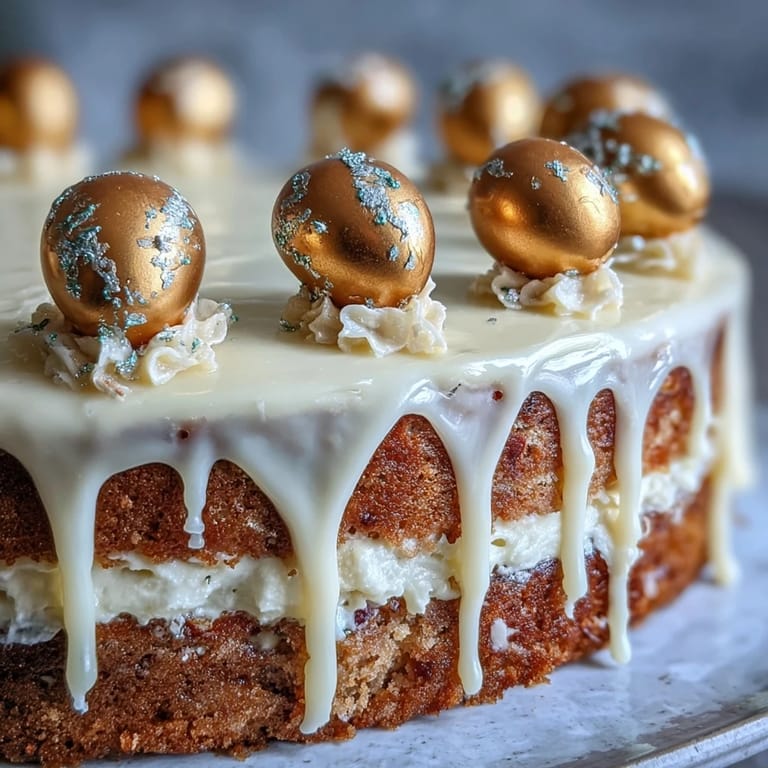
- Decorate with gold balloons:
- Spray crispy pearls or malt balls with edible gold spray (or toss them in luster powder mixed with a bit of gum arabic), let them dry completely, then attach toothpicks or thin cake wires. Cluster them on top like they're floating, and they'll catch the light beautifully.
- Final chill and serve:
- Refrigerate the finished cake until serving time, then bring it to room temperature for 20 minutes before slicing for the best texture and flavor. The wait is worth it.
 Save
Save When Sarah blew out her candles and cut into that cake, the layers were perfectly even, the frosting was silky, and those gold balloons caught the light like tiny celebrations all on their own. She took a bite and closed her eyes, and I realized that this cake had become more than dessert—it was a tangible way of saying "I believe in you" in a language made of sugar and butter and care.
The Vanilla Sponge Secret
The magic in this cake lives in the milk. Most vanilla cakes use buttermilk or all butter, but this one uses whole milk to keep things light and tender without the tang. The fat in whole milk keeps each crumb moist while the liquid ensures even distribution throughout the batter. I learned this by accident when I ran out of buttermilk once and grabbed whole milk instead, then forgot to tell anyone—three compliments later, I realized I'd found something special.
White Chocolate That Actually Works
White chocolate can be tricky because it's not actually chocolate at all—it's cocoa butter, sugar, and milk solids without the cocoa solids that make real chocolate stable. This means it needs gentler handling and careful temperature control. When melting it for the buttercream, I use a double boiler (not direct heat) and cool it completely before mixing because warm white chocolate can break the buttercream emulsion. For the drip, the cream-to-chocolate ratio creates a ganache that's forgiving and flows beautifully without being overly thick.
Decoration Timing and Gold Details
The gold balloon decoration is easier than it looks, but timing matters. You want to spray or dust the pearls a few hours before serving so they're completely dry and the gold finish has set, but close enough to serving that they don't get dusty. The toothpicks or cake wires need to be inserted at an angle so the pearls look like they're floating upward, and clustering them in odd numbers (three, five, seven) instead of even numbers makes the arrangement feel more natural and artistic.
- Practice the white chocolate drip on a test cake or even parchment paper before your actual cake—muscle memory helps you relax and make it look intentional.
- If you're making this cake the day before, store it uncovered in the refrigerator overnight so it sets perfectly, then cover it loosely a few hours before guests arrive.
- Bring the finished cake out of the refrigerator 20 minutes before cutting so the layers slice cleanly without cracking—cold cake crumbles, warm cake slices like silk.
 Save
Save This cake exists in the space between showstopper and genuinely delicious, where people's faces light up twice—once for how it looks, and again when they taste it. That's the moment you'll remember.
Recipe FAQs
- → How do I achieve a smooth white chocolate drip?
Heat heavy cream until simmering, then pour over finely chopped white chocolate. Let sit 1 minute, stir until smooth, and cool to room temperature before applying the drip.
- → What is the best way to keep the vanilla sponge moist?
Ensure not to overbake the layers and use room temperature ingredients for a tender, moist crumb. Incorporating whole milk adds additional moisture.
- → How can I create the edible gold balloon decorations?
Spray white chocolate crispy pearls or malt balls with edible gold spray or roll them in gold-dusted luster powder, then attach with toothpicks or thin wires and arrange atop the cake.
- → Can I prepare this cake in advance?
Yes, the cake can be refrigerated up to 3 days. Bring to room temperature before serving to best enjoy flavors and texture.
- → What tools do I need for assembly and decoration?
An electric mixer, offset spatula, squeeze bottle or spoon for the drip, parchment paper, and toothpicks or thin wires for decorations are recommended.